 |
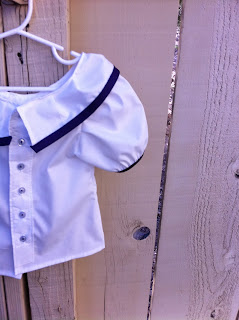
| For the life of me, I can't get this damn photo to rotate the right way. |
 |
| The back side of the blouse |
So, I've been working on this costume piece by piece over the last few weeks in between another huge project of costume making. I made the blouse first. To make the blouse, I used a shirt that fit my daughter fairly well and fashioned my pattern off of that. From then on, I was pretty much winging it. Sometimes, my best work comes from that. I am really happy with how it turned out. Its tailored in the front and buttons down in the rear and looks freaking adorable on her.
Then I put together a tiered skirt made from stretch velvet and tulle. I had to redo the bottom tier twice and I'm still not thrilled with how it turned out, but I have to keep reminding myself that its for a costume and I need to not be such a perfectionist.
I wasn't able to find the prints I wanted to make the handkerchief skirt but I did find some cute fat quarter fabric that worked perfectly. I cut the fat quarters into perfect squares and hemmed the raw edges, then I followed this tutorial to make the final product: Snips & Spice: Handkerchief Skirt
I also made a pair of bloomers to go under the skirts. You won't be able to see the bloomers in the final costume, but I felt they were necessary, plus I just really wanted to make them. Here is the tutorial I used for the bloomers: Sew Easy Being Green: Rectangle Bloomers
I was able to find the perfect Pirate boots on Zulily.com for about $14.00 and they will be great fall/winter boots for The Bug in the months to come. They turned out to be exactly what I had drawn. I was pretty stoked about that!
Finally, I made the pirate hat. I took at pattern that I had for a reversible bucket hat and made the brim 6 inches wide instead of the the original 3.5inches. I made the hat from heavy duty craft felt. I lined the bucket portion with the same fabric I used for the bloomers. You won't be able to see this, but it adds a little stiffness to the top and also makes for a softer feel inside. The Bug has tactile stress and would end up ripping the hat off if it was too itchy. I took some dark purple bias tape and ran it around the edge of the brim for a spark of color. I then placed the hat on my mannequin head and shaped it into the Tricorne shape. I hand stitched the sides to the top to keep them in place and then added a little pirate skull applique for flair. I still need to get a giant purple feather to go on it, but I'm running out of time for that one. Here is the finished hat:
 |
| Tricorne Pirate hat from a Bucket Hat Pattern |
Here is a pic of the almost finished product:
 | |
| The Bug in her Pirate Princess Costume (not quite complete) |
Much love!
